Cloudy’s Tips & Tricks: Lightning Record Detail Tabs

One great feature of the Salesforce Lightning UI is the “Tabs” page component. Tabs allow admins to reduce scrolling by putting different pieces of a page layout into Tabs – rather than stacked or otherwise spread out.
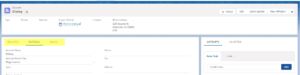
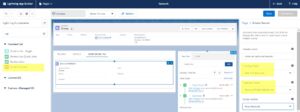
This example shows a common use case: Putting Account Details and Related Lists in tabs makes viewing all facets of the account easier & faster than the scrolling required in Classic:
Admins everywhere have lost no time taking advantage of this great design enhancement, but they quickly ran into limitations, and the desire to do more with tabs!
One idea for extending the utility of Tabs is to break up the record details page itself into different tabs. If you have many fields on your key objects, you may have noticed that the “roomy” layout of lightning details components results in an overly long details page.
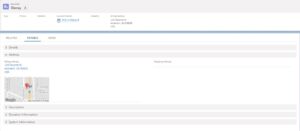
If you are experiencing this pain, Cloudy’s first recommendation is to explore what you can do with the collapsible page layout Sections. Collapsible sections alleviate the pain of scrolling by remembering each user’s preference – as a user leaves a section “Open” or “Shut”, each page of the same type will then be displayed that way. So a user experiences a view of that record type that is both condensed and personalized to the sections that they prefer to see:
If this doesn’t take it far enough for you, then go vote for this Idea on the Salesforce Idea Exchange: Tabs on Record Detail for Page Layout Sections
This Idea has received enough upvotes that it is now “under review” by Salesforce product developers – meaning that we may see this functionality in a future Salesforce release! But if you don’t want to wait, you can put detail fields onto separate tabs using this sweet hack using object Actions and the “Update a Record” component:
- Create an “Action” on the Object and set the Action Type to “Update a Record”.
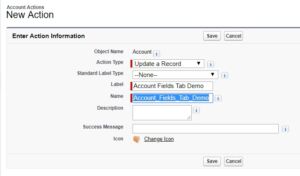
- You will then be directed to the Action layout editor, where you can select the fields you wish to appear on your Tab.
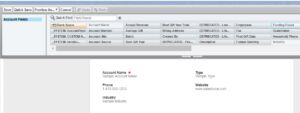
- Finally on the Lightning Page, add the tab for your new “action.” Select the “Related Record” component; for the Lookup Field select “Use this Account” [Or whatever object you are working on], and for the Update Action, select the “Action” that you created in Step 1.
Viola!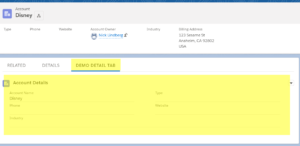
If you would like help with this idea, or anything else, please Contact Us!
With the rapid evolution of technology, Salesforce solutions are ever-changing and improving features. Contact our team for up-to-date information.