Cloudy’s Favorite Apps: SyncApps by Cazoomi – Part 2 “Tips & Tricks”
 MailChimp is a popular platform for mass email and marketing automation – with good reason! The interface is friendly, the marketing automation options are robust, the templates are up to date, documentation & support are good, and the price is competitive.
Cloudy has previously reviewed a great app for integrating MailChimp with Salesforce – Cazoomi SyncApps: You can read that full review HERE
**The bottom line from that review is that Cloudy does not recommend the free/native Salesforce integration offered by MailChimp. For all the good features MailChimp offers – the “free” integration is not one of them.**
But Cazoomi SyncApps continues to be a solid choice for Salesforce integration at an affordable price. Cloudy is back today to share a few more tips and tricks to make this MailChimp integration really pop:
1) Use the Marketing List package: In Cazoomi setup, you will have the choice to use Salesforce Campaigns OR Cazoomi’s custom “Marketing Lists” option to manage your lists in Salesforce. You may be tempted to stick with just Campaigns for “simplicity”, but that is a mistake!
Cazoomi integration is already going to use Campaigns to track email SENDS to a particular list – so if you are using Campaigns for master list management AND to track individual sends, you are likely to experience confusion down the line. Additionally, your visibility to which master lists a Contact is on would get “buried” in the Contact History related list, as various Campaign Member records get added over time.
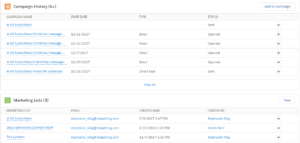
By using the Marketing Lists object, you maintain clear divisions and visibility. In this screenshot, you see that this contact is on 3 Marketing Lists, while under Campaign History you can see all the various emails they have received recently.
2) Rollup Summary Fields on the Campaign
Cazoomi provides stats for Opens, Clicks, and Bounces on the Campaign Member records associated with a Campaign, and you can easily report on these stats in a Campaign Member report. But you may enjoy having quick, campaign-level visibility to your email results. Using standard Salesforce Rollup Summary fields, Cloudy adds 5 fields to track Campaign results:
 The “Total Opens” field is a simple SUM rollup of the corresponding “Opens” fields on the Campaign Member record. For the “Unique Opens” field, you must add a filter to the rollup, like so:
3) Performance Rate formulas
Using your new Rollup Summary fields, you now have the ability to calculate the Open and Click “Rates” of your Campaign, by comparing the “Unique” Opens and Clicks with the Total in the campaign.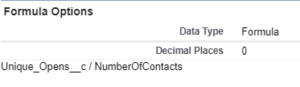
4) Charts!
After building the Rollups and Formulas above, you can now roll out a Campaign page layout like this one:
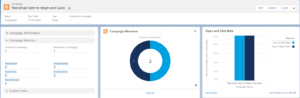
- On the left, in the record detail, we can see the Rollup Summaries of Total and Unique Opens, Clicks, and Bounces.
- The center donut chart is the default Lightning Campaign Member list, which shows a breakdown of Campaign Member Statuses – in this case, Sent vs Opened
- The chart on the right is a custom chart based on the Formula fields we created, showing the Open and Click Rate for this campaign.
If you would like help integrating Salesforce with MailChimp or any other email platform, please Contact Us!
With the rapid evolution of technology, Salesforce solutions are ever-changing and improving features. Contact our team for up-to-date information.