Cloudy’s Chalkboard: Email Template Pro Tips!
In Cloudy’s last two posts, you learned how to set up salesforce.com email letterheads and templates. Once you get started with email templates, you won’t want to quit! The possibilities for saving time and streamlining processes are many, but you will encounter questions and roadblocks as your imagination kicks in. Here are a couple of Cloudy’s favorite Pro Tips for getting the most out of Email Templates:
Pro Tip #1: Merging information from related records
You may have noticed that unlike elsewhere in salesforce.com (such as in the advanced formula editor), the Merge Field menu does not allow you to navigate through layers of related records to grab the Merge Field you want. For instance, if you are sending a Contact-related email, you cannot insert a field from their related Account record.
Get around this by adding a formula field to the Contact record which captures the related Account field that you need for your email! You don’t have to put this field on your page layout, and you may want to give it a distinctive name and description so that you and other administrators can easily remember its function. ie. “THIS IS AN EMAIL TEMPLATE FORMULA FIELD!”
Pro Tip #2: “Sending User” Information
If you have numerous reps all using the same Template to email Contacts, you may want a way for each rep’s contact information to populate in the template automatically – for instance, as a personalized “signature”.
Simply select “Sending User Fields” from the “Select Field Type” picklist. Whereas most of your template merge fields must come from the Object that the email will be related to (ie. “Contact”), the Sending User fields are an exception.
 |
| This merge field will allow the recipient to easily call the rep who sent the email. |
**IF YOUR “SENDING USER” MERGE FIELDS ARE NOT POPULATING CORRECTLY: check that the correct user information is entered on the User record!
Pro Tip #3: Dynamic URLs
You can add a basic URL link by:
1: Type the text as you would like it to appear and highlight it.
2: Click the LINK icon on the tool bar.
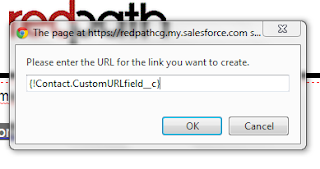
3: Enter the web url in the box that appears.
But what if you don’t want to link to a STATIC website, and instead you want to send a dynamic/individualized URL based on the record you are sending from?
Simply create a URL field on the primary object, and populate it with your individualized URL links. Then on your template, follow the same steps as above but paste the MERGE FIELD for your new URL field in the text box.
You now have a dynamic URL link that will change based on the record it is sent from!
These are just a few of Cloudy’s favorite email template tips. If you have more questions about advanced functionality with salesforce.com email templates, Contact Us!
Cloudy Cumulus is part of Redpath Consulting Group, based in Minneapolis, MN (c) 2012
With the rapid evolution of technology, Salesforce solutions are ever-changing and improving features. Contact our team for up-to-date information.


